While through hiking the Appalachian Trail in 2017 I will have a need for two types of shelters to take along with me at different points of my trip. In the beginning I intend to take along my hammock system. Later when I reach specific sections that are scarce with trees I might switch to my Army bivy setup and then to hammocks again once back in the woods. Also in the beginning and ending of my trip it will be cold at night so I will need to use my nice winter quilts with my hammock.
I have made some videos to show you in high speed the setup process of my hammock shelter. I’ve also taken a series of pictures of each of the parts. This way you can see in detail exactly how I personally hang my hammock.
To start here is a video of my hammock being hung:
I am using a speed sack from Jacks-R-Better.com to keep my hammock off the ground while I hang it and it also is the hammock’s stuff sack.


I use the Jacks-R-Better tree saver straps combined with a Titanium Dutch Clip and a Whoopie Sling as my suspension.


This connects to my hammock via a Jacks-R-Better Carabiner rated for 500lbs. The carabiner hooks to a Dog Bone Loop that is wrapped twice through the end of my ENO Double Wide Hammock. The excess from the Whoopie Sling is looped and hung from the Carabiner to keep it off the ground. The Carabiner also acts as a drip point if it happens to rain hard and water tries to wick down the Whoopie Slings.

Next up is my ENO Double Wide Hammock. I’ve had this particular hammock for about 5-6yrs now. It has been my go to hammock for every trip I use a hammock on except one. I tried a single nest hammock out once to save space in my pack but found it not to be roomy enough to my liking when sleeping in it. I felt like the single nest was going to dump me out so I have stuck to this one ever since.


Here is a video of me installing my winter quilts…
I prefer the Jacks-R-Better Old Rag Mountain Down quilts. They can be used for both top or bottom quilts. I have been down to -10*F or so with one of these quilts as a under quilt and a North Face 0*F sleeping bag as a top quilt. I just recently for this coming trip purchased my second Old Rag Mountain Quilt. I will be testing the two together soon to ensure their ability to keep me warm on my trip. Here are some pictures of them…

The quilts attach to the hammock using bungee cords so they don’t get ripped or stressed when getting in or out. The right end seen in the above picture is what is called the “Foot Box”. That portion has Velcro to allow me to close the quilt around the hammock for 24 inches from the end. This helps keep out drafts from freezing my feet. The head end is connected using a bungee strap that holds the quilt snug around my sides. It connects to the end of the hammock up by the head. The top quilt is basically used like a blanket. I wrap the foot box around the hammock the same as I did the under quilt only loosely. The foot end of the top quilt is also attached to the end of the hammock using a carabiner. This keeps it from bunching up on me at night. You can see this in the following pictures…


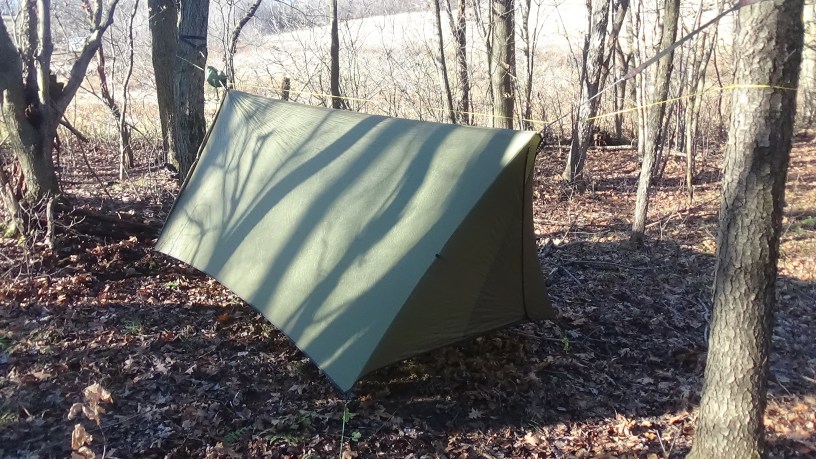
Next up is hanging my tarp…
I use the ENO House Fly for my go to tarp these days and for this coming AT through hike. I also purchased a new ridge line from DutchWareGear.com to hang it from. I got 30 feet of bright yellow Zing-it with a Titanium Dutch Hook and a Titanium Dutch Wasp line tensioner. I also got two soft shackles for attaching the tarp to the ridge line. In this video is my very first time setting it up with this new ridge line. It was simple enough to do but the Dutch Wasp is tiny for my BIG fingers and will take some getting used to handling.
Here are some pictures of those parts…


The tarp is rather simple and does a great job at keeping the weather out. The tarp can be placed in many setups such as a full tent mode over the hammock giving you complete privacy and protection or you can place it up in what is called porch mode. The doors on either end can be opened or closed with ease and even rolled up and locked out of the way.


I use suspension tie-outs on my tarp because it is made of silnylon and will stretch over time while it is hung. The suspension tie-outs basically shrink keeping the tarp taught as it stretches out. This prevents you from having to get out of the hammock in the middle of the night and tightening up all the lines due to it sagging on you. They also help prevent damage to your tarp if someone trips over you lines. I use suspension lines on all four corners and four doors.
I use MSR Ground Hog stakes one in each corner. I carry four with me. I also have two Titanium Vargo stakes for backup in the event I lose or break one. Some times I want to setup my doors differently and that may require them to have their own stakes as well.

Taking down this shelter system is just as fast and easy as setting it up. The tarp just gets unstaked and then undone on the end with the stuff sack and basically stuffed into the sack as you walk towards the other tree. Then you unattach the quilts and stuff them into their sacks. Next you start at the end of the hammock with the stuff sack on it and disconnect it from the tree. Now just stuff it into the sack while walking towards the other tree. Nothing ever has to touch the ground. Nothing ever has to get muddy or wet etc… You can take the tarp down last if it is raining in order to keep everything dry underneath.
Here is a video of the hammock being put away…
All my fabrics I use in the woods are treated with Permethrin. It prevents nearly everything from biting you including tics, fleas, mosquitoes, and more…

So short of a pillow and my clothing I intend to sleep in, this is basically my primary sheltering system for my 2017 Appalachian Trail through hike.
There are some sections I may need to take a ground system for awhile and I will show that setup on another blog.
Hope you enjoyed this article and stick around for more to come. Remember once my hike begins I will be doing my best to post weekly blogs with pics and some short videos from the hike as I go…
